
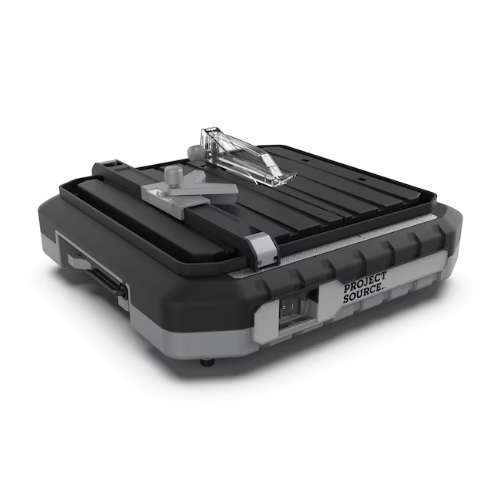
Project Source 4.1 -Amp 4.5-in -Blade Tabletop Tile Saw
- 4.1-Amp motor generates 5300 RPM for precise and quick cuts through tile and porcelain
- Table tilts for accurate 45° bevel cuts
- Adjustable rip fence with miter gauge for accurate angled cuts
- Compact design for easy transport
Unlocking Professional Results with the Right Tool for DIY Enthusiasts
When it comes to home renovation projects, few tools are as transformative as a quality tile saw. Whether you’re revamping your bathroom, installing a kitchen backsplash, or creating an outdoor patio, the Project Source tile saw stands out as an accessible and reliable option for both beginners and experienced DIYers. This comprehensive guide will walk you through everything you need to know about these versatile tools that can elevate your tiling projects from amateur to professional-looking results.
Understanding the Purpose of a Project Source Tile Saw
A Project Source tile saw is primarily designed to make precise cuts through ceramic, porcelain, and stone tiles. Unlike standard cutting tools, these specialized saws use water-cooling technology to reduce dust, prevent overheating, and achieve clean, chip-free cuts that are essential for professional-looking tile installations.
The beauty of the Project Source line lies in its accessibility—these tools bridge the gap between professional-grade equipment and budget-friendly options for homeowners. With the right Project Source tile saw in your arsenal, you can tackle projects ranging from simple bathroom renovations to elaborate mosaic designs that might otherwise require hiring a professional.
Exploring the Project Source Tile Saw Lineup
Project Source offers several models to accommodate different project needs and budgets. Their lineup typically includes:
- Compact Tabletop Models: These lightweight, portable options are perfect for small to medium projects and easy storage. They typically feature 7-inch blades and can handle most standard tile sizes with ease.
- Mid-Range Tile Saws: Offering a balance between portability and cutting capacity, these models often come with 8-inch blades and sturdier tables for increased stability during cutting.
- Professional-Grade Options: For serious DIYers or those tackling larger renovation projects, Project Source offers more robust models with 10-inch blades, larger cutting tables, and enhanced features for precision work.
Each model comes with distinct advantages, but all share the Project Source commitment to quality and accessibility. The compact models excel in tight spaces and for occasional use, while the professional-grade options provide the stability and power needed for extensive projects.
Where to Purchase Your Project Source Tile Saw
Project Source products are primarily available through Lowe’s home improvement stores, which carry this exclusive brand. You can find them both in physical store locations and through Lowe’s online marketplace. The availability may vary by location, so checking their website before making a special trip can save you time.
During home improvement seasons (typically spring and summer), you might find special promotions on these tools. Additionally, floor models or returned items are occasionally available at discounted prices if you’re working with a tight budget.
Price points for Project Source tile saws typically range from $89-$249, depending on the model, features, and cutting capacity. This pricing structure positions them as an excellent middle-ground option—more capable than entry-level tile nippers but more affordable than contractor-grade equipment that might cost $500 or more.
Essential Features and Specifications
Cutting Capacity
The cutting capacity of Project Source tile saws varies by model but generally allows for:
- Straight cuts on tiles up to 20 inches in length (larger models)
- Diagonal cuts on tiles up to 14 inches (standard models)
- Depth cuts ranging from 1 inch to 3.5 inches, depending on the blade size and model
This range makes them suitable for most residential projects, including floor tiles, wall tiles, and decorative pieces. However, for extremely large format tiles (24+ inches), you might need to consider higher-end models or rental equipment.
Blade Specifications
Project Source tile saws typically accommodate diamond-tipped blades ranging from 7 to 10 inches in diameter. The standard models often come equipped with a 7-inch continuous rim diamond blade, which is versatile enough for most ceramic and porcelain tiles.
Replacement blades are readily available at the same retailers that sell the saws, with prices ranging from $15-$45 depending on quality and specific cutting requirements. For special materials like natural stone or glass, specialized blades may be recommended for optimal results.
Water Reservoir System
One of the standout features of Project Source tile saws is their integrated water reservoir systems. These reservoirs:
- Circulate water over the blade during cutting to minimize dust
- Prevent overheating of both the blade and the tile
- Allow for smoother, cleaner cuts with less chipping
- Make indoor cutting projects possible with minimal mess
The reservoirs typically hold between 2-3 gallons of water, sufficient for several hours of cutting before needing a refill. The water management systems use a combination of pumps and gravity to ensure consistent flow over the cutting surface.
Power and Electrical Requirements
Most Project Source tile saws operate on standard 120V household electrical circuits, drawing between 3.5-7.5 amps depending on the model. This means you can typically use them with regular outlets without special electrical accommodations.
The motors range from 0.75 to 1.5 horsepower, providing sufficient power for cutting through ceramic, porcelain, and most natural stone tiles. For extremely hard materials like granite or marble, the higher-end models with more powerful motors are recommended for efficient cutting.
Mastering the Use of Your Project Source Tile Saw
Setting Up Your Workspace
Before beginning any cutting project, proper setup is crucial:
- Position your saw on a stable, level surface with sufficient room around it for maneuvering tiles.
- Fill the water reservoir to the recommended level (usually marked inside the tank).
- Ensure the water pump is submerged and properly positioned.
- Connect to a power source, preferably through a GFCI outlet for safety when working with water and electricity.
- Test the water flow before making your first cut to ensure proper cooling will occur.
For indoor work, laying down plastic sheeting or drop cloths can help contain water splatter, while setting up near a drain or in a garage can simplify cleanup afterward.
Making Basic Straight Cuts
To make standard straight cuts with your Project Source tile saw:
- Mark your cutting line clearly on the tile with a pencil or tile marker.
- Turn on the saw and allow the blade to reach full speed.
- Ensure water is flowing properly over the blade.
- Place the tile on the sliding table with your cutting line aligned with the blade.
- Holding the tile firmly against the guide, slowly push the table forward to move the tile through the blade.
- Maintain steady pressure and consistent speed for the cleanest cut.
- After completing the cut, turn off the saw before removing your tile.
For beginners, practice on scrap pieces first to get a feel for the appropriate feed rate and pressure. Pushing too quickly can lead to chipping, while moving too slowly might cause overheating despite the water cooling.
Executing Specialty Cuts
Project Source tile saws can handle various specialty cuts with the right techniques:
Diagonal Cuts:
- Set your measuring guide at the desired angle (most models allow for 22.5° and 45° angles).
- Mark your cutting line accordingly.
- Feed the tile through at a slightly slower rate than straight cuts to prevent chipping at the corners.
L-Cuts or Notches:
- Make your straight cut to the point where the L-cut should begin.
- Without turning off the saw, carefully back the tile out.
- Reposition to make the second cut that completes the L-shape.
- For deeper notches, you may need to make several parallel cuts and then clean out the material between cuts.
Plunge Cuts:
- Mark the area to be cut out.
- With the saw running and water flowing, carefully lower the tile onto the blade to begin your cut.
- Proceed slowly to avoid kickback or binding.
- These cuts are ideal for creating openings for electrical outlets or pipes.
Compatibility with Different Materials
Project Source tile saws are designed to handle a variety of materials commonly used in home improvement projects:
- Ceramic Tile: Excellent compatibility; cuts cleanly with minimal chipping.
- Porcelain Tile: Good compatibility, though harder porcelains may require slower feed rates.
- Natural Stone: Compatible with most slate, travertine, and limestone with appropriate blades.
- Marble and Granite: Can cut these materials, but performance depends on thickness and hardness; premium blades recommended.
- Glass Tile: Specialty blades required; slow feed rates essential to prevent chipping.
- Quarry Tile: Compatible but may experience more wear on standard blades due to material hardness.
For optimal results with specialty materials, considering blade upgrades is worthwhile. The standard blade included with most Project Source saws is adequate for ceramic and basic porcelain, but investing in material-specific blades can significantly improve results for more demanding applications.
Maintenance and Longevity
Regular Cleaning Procedures
Maintaining your Project Source tile saw extends its lifespan and ensures consistent cutting quality:
- After Each Use:
- Drain and rinse the water reservoir to remove tile sediment
- Wipe down the table surface and guides to prevent mineral buildup
- Allow components to dry before storage
- Weekly Maintenance:
- Check blade for signs of wear or damage
- Lubricate moving parts according to the manufacturer’s recommendations
- Inspect water pump function and clean filter if applicable
- Monthly Maintenance:
- Check blade alignment and adjust if necessary
- Examine all electrical connections and cords for wear
- Deep clean the water system with a mild vinegar solution to prevent mineral buildup
The cutting table should be kept clean and free of debris to ensure smooth sliding action. For models with a water pump, regular cleaning of the intake filter prevents clogging and maintains optimal water flow.
Blade Maintenance and Replacement
The blade is the heart of your tile saw, and proper care significantly impacts performance:
- Inspect regularly: Look for missing segments, warping, or excessive wear.
- Clean after use: Remove built-up material with a stiff brush to maintain cutting efficiency.
- Replace when needed: Signs that replacement is necessary include:
- Slower cutting speeds despite proper technique
- Increased chipping at cut edges
- Visible wear on diamond segments
- Unusual noise during operation
When replacing blades, ensure the new blade meets the manufacturer’s specifications for size, arbor hole diameter, and maximum RPM rating. Using inappropriate blades can be dangerous and may void your warranty.
Warranty and Consumer Protection
Project Source tile saws typically come with a 1-year limited warranty covering manufacturing defects and mechanical failures under normal use conditions. This warranty generally excludes:
- Wear items like blades and water pumps
- Damage from misuse or improper maintenance
- Commercial use (these are primarily designed for DIY/homeowner use)
To maintain warranty coverage, keep your original receipt and register your product if the option is available. Some retailers offer extended protection plans for an additional cost, which might be worth considering for higher-end models or if you anticipate heavy usage.
For warranty service, contact the retailer where you purchased the saw first, as they can often facilitate the process. Having your model number and purchase documentation readily available expedites claims processing.
Comparative Analysis: Project Source vs. Other Brands
When positioned against competitors, Project Source tile saws offer distinct advantages and considerations:
Compared to Budget Brands (QEP, Leegol):
- Generally superior build quality and motor longevity
- More precise cutting guides and stable platforms
- Comparable pricing with better overall value
Compared to Mid-Range Options (SKIL, RIDGID):
- Similar feature sets with competitive pricing
- Possibly fewer accessory options
- Comparable cutting capacity and precision
Compared to Premium Brands (DeWALT, Makita, MK Diamond):
- More affordable by 30-50%
- Less robust for continuous heavy use
- Fewer advanced features but covers essential functions for most DIY projects
The Project Source advantage often comes down to accessibility and value proposition—offering sufficient quality and capability for typical homeowner projects without the premium price tag of contractor-grade equipment.
Safety Considerations
Operating a tile saw safely requires attention to several important practices:
- Personal Protective Equipment:
- Always wear safety glasses to protect against tile chips
- Consider ear protection during extended use
- Avoid loose clothing that could get caught in moving parts
- Electrical Safety:
- Always use GFCI-protected outlets when working with water
- Keep the power cord away from water and cutting areas
- Inspect cords regularly for damage or wear
- Operational Safety:
- Never force a tile through the cut; let the blade do the work
- Keep hands at least 6 inches away from the blade during operation
- Never remove guards or safety features
- Wait for the blade to stop completely before adjusting the tile or removing cut pieces
- Environmental Considerations:
- Ensure adequate ventilation, particularly for indoor cutting
- Be mindful of slippery conditions created by water spray
- Have a plan for water disposal that complies with local regulations
Most Project Source models include blade guards, splash guards, and stable bases as standard safety features. Some higher-end models may also include thermal overload protection to prevent motor damage from overheating.
Portability and Storage Solutions
The portability of Project Source tile saws varies by model, with important considerations for both transportation and storage:
Compact Models:
- Typically weigh 15-25 pounds without water
- Often feature built-in carrying handles
- Can be transported by one person
- Store easily on garage shelving or in closets
Mid-Range Models:
- Weight ranges from 25-45 pounds
- May feature fold-down stands or detachable legs
- Require more storage space but still manageable in most home workshops
Larger Models:
- Can weigh 50+ pounds
- Some include wheeled stands for easier movement
- Require dedicated storage space when not in use
For contractors or DIYers working across multiple locations, the compact models offer significant advantages in portability. However, this convenience typically comes with trade-offs in cutting capacity and stability.
Assembly and Setup
Most Project Source tile saws require some assembly upon purchase, though the process is generally straightforward:
- Typical Components to Assemble:
- Attaching the cutting table to the base
- Installing the blade guard and splash guards
- Setting up the water reservoir and pump
- Mounting the blade (if not pre-installed)
- Tools Required:
- Basic hand tools (typically included or specified in the manual)
- Level surface for assembly
- 15-30 minutes of time for most models
- First-Time Setup:
- Adjust the blade depth and alignment according to manual instructions
- Fill the water reservoir and check for proper water flow
- Make test cuts on scrap material to ensure proper function
Clear, illustrated instructions are included with all models, and many users find online video tutorials helpful for visualizing the assembly process. Taking time to ensure proper assembly and adjustment pays dividends in cutting precision and tool longevity.
Troubleshooting Common Issues
Even well-maintained tile saws can encounter operational issues. Here are solutions to common problems:
Water Pump Not Working:
- Check for clogs in the intake filter
- Ensure the pump is fully submerged
- Verify proper electrical connections
- Consider replacing the pump if other solutions fail (inexpensive and widely available)
Motor Overheating:
- Ensure adequate water flow over the blade
- Check for binding or resistance in the blade
- Avoid forcing the tile through cuts too quickly
- Allow cooling time between extensive cuts
Rough or Chipped Cuts:
- Examine the blade for wear or damage
- Slow down the feed rate
- Ensure the tile is firmly supported during cutting
- Consider upgrading to a higher-quality blade
Table Movement Issues:
- Clean and lubricate the sliding rails
- Check for debris obstructing smooth movement
- Ensure the table is properly aligned with the blade
- Tighten any loose components affecting stability
Excessive Water Spray:
- Adjust splash guards to better contain spray
- Check for proper water flow rate (too high causes splashing)
- Position the saw to direct spray away from work areas
- Use towels or barriers to contain overspray
Project Planning with Your Tile Saw
Successfully completing tiling projects requires thoughtful planning beyond just making cuts:
- Material Estimation:
- Calculate your tile needs plus 10-15% for waste and cuts
- Consider the tile layout pattern when estimating cutting needs
- Plan for the most efficient use of materials to minimize waste
- Cut Sequencing:
- Complete all similar cuts together to minimize saw adjustments
- Start with the most visible cuts that will be prominent in the finished installation
- Save odd-shaped or complex cuts for after you’ve gained comfort with the saw
- Project Timeline:
- Allow for saw setup and cleanup time in your project schedule
- Plan for drying time between cutting and installation
- Schedule more demanding cuts when you’re fresh and focused
- Workspace Organization:
- Create separate areas for uncut tiles, freshly cut pieces, and waste
- Have a system for marking tiles that need cutting
- Position your saw to minimize carrying distance for large tiles
Conclusion: Is a Project Source Tile Saw Right for Your Project?
After exploring the capabilities, features, and considerations of Project Source tile saws, you might be wondering if this is the right tool for your specific needs. The Project Source tile saw represents an excellent balance of affordability, functionality, and quality for most DIY home improvement projects involving tile.
These saws are particularly well-suited for:
- First-time tilers looking for an accessible entry point
- Homeowners tackling bathroom or kitchen renovations
- DIY enthusiasts who want professional-looking results without contractor-grade prices
- Occasional users who need reliable performance without excessive investment
While professional contractors or those undertaking massive renovation projects might benefit from higher-end models with additional features and durability, the vast majority of homeowners will find that a Project Source tile saw meets or exceeds their needs for typical residential projects.
The combination of reasonable pricing, accessible features, and sufficient cutting capacity makes these tools a smart investment that can transform your tiling projects from daunting challenges to satisfying accomplishments. With proper care and technique, your Project Source tile saw can be a trusted workshop companion through countless home improvement adventures.
Whether you’re laying your first bathroom floor or tackling an elaborate kitchen backsplash, the right tools make all the difference—and a quality tile saw like those offered by Project Source can be the difference between amateur results and professionally finished spaces you’ll be proud to show off for years to come.